Nail clippers aren't just fixing tools, they're the obscure icons of our particular care routines, shaping our nails and enhancing our overall appearance. Still, indeed the most dependable nail clippers can lose their edge over time, performing in lower effective trims. In this comprehensive companion, Nghia Nippers will claw into how to sharpen nail clippers, exploring their significance and introducing three scrupulous styles to edge them. By learning these ways, you can elevate your grooming routine to achieve an indefectible trim with ease.
1. The importance of nail clippers
Nail clippers play a vital part in particular grooming and hygiene. Their significance extends beyond the realm of a simple tool; rather, they're integral to maintaining overall well- being and presenting a polished appearance. There are crucial aspects pressing the significance of nail clippers
Hygiene and Health
Regular nail trouncing is essential for maintaining proper hygiene. grown nails can harbor dirt, bacteria, and fungi, leading to infections and unwelcome odors. By using large nail clipper, individuals can effectively manage the length of their nails, reducing the threat of infections and promoting a healthier nail terrain.
Prevention of nail- related issues
untidy nails can contribute to colorful issues, similar as ingrown toenails and fungal infections. Nail clippers offer a preventative measure against these problems by allowing individualities to trim their nails with perfection, minimizing the liability of painful and uncomfortable conditions.
Cosmetic appearance
Well- prepped nails significantly contribute to one's overall appearance. Neatly trimmed nails enhance a person's aesthetic appeal and convey a sense of cleanliness and attention to detail. Nail clippers are necessary for achieving a polished look, whether for particular satisfaction or professional donation.
Comfort and functionality
Exorbitantly long nails can beget discomfort, especially when engaged in everyday conditioning. Nail clippers give a practical result for maintaining comfortable nail lengths, icing ease of movement and reducing the liability of snagging or breakage.
Psychological well- being
Engaging in fixing rituals, including nail trouncing, can have positive effects on internal well- being. The act of tone- care and attention to particular appearance can boost confidence and contribute to a positive tone- image. High quality nail clippers, as simple as they may feel, play a part in fostering a sense of tone- worth and fixing satisfaction.
2. How to Sharpen Nail Clippers
Sharpen stainless steel nail clippers is a straightforward process that, when done rightly, can restore their effectiveness and extend their lifetime. There are three styles on how to sharpen nail clippers.
2.1 Using a file or whetstone
Gather Accoutrements
- Nail clippers
- Fine- fortitude train or whetstone
- Lubricant( water workshop for whetstone)
Open the Clippers
- Ensure the nail clippers are completely open to expose the slice edges.
Train the Blades
- With the train or whetstone, precisely file each blade of the nail clippers. Use a broad stir along the cutting edge.
- Maintain harmonious pressure to achieve an indeed sharp edge.
Repeat the Process
- Reprise the form process until you achieve the asked sharpness.
- Check the sharpness periodically by gently closing the clippers to ensure they cut easily.
Clean and slick
- Wipe off any essence forms and residue.
- If using a whetstone, slick it with water. Clean the clippers after stropping to remove any debris.
2.2 Using a sharpening stone
Prepare Accoutrements
- Nail clippers
- Fine- fortitude stropping gravestone
- Lubricant( water or honing oil painting)
Position the Clippers
- Open the nail clippers to expose the blades.
Slide Across the Stone
- Slide the blades across the stropping gravestone at a harmonious angle.
- Ensure strokes on both blades to maintain invariant sharpness.
Reprise as Necessary
- Continue the stropping process until the blades are sufficiently sharp.
- Check for sharpness by gently closing the clippers.
Clean and slick
- Clean the clippers to remove any essence patches.
- If using honing oil painting, wipe the redundant oil painting from the blades after stropping.
2.3 Using a grinding wheel
Gather Accoutrements
- Nail clippers
- Grinding wheel
- Safety gear( goggles, gloves)
Safety preventives
- Put on safety goggles and gloves to cover yourself from sparks.
Guide the Blades
- Precisely guide the blades against the grinding wheel.
- Maintain a steady pace to avoid overheating the essence.
Examiner Sharpness
- Periodically check the sharpness by gently closing the clippers.
- Avoid inordinate grinding to help damage to the clippers.
Clean and check
- Clean the clippers completely to remove any essence patches.
- Check the blades for any signs of damage and ensure they're slightly sharp.
By following these styles, you can successfully sharpen your nail clippers and enjoy precise and effective trouncing. Flash back to exercise caution, especially when using a grinding wheel, and prioritize safety throughout the stropping process.
3. Things to keep in mind when sharpening nail clippers
By keeping these considerations in mind, you can enhance the stropping process, know how to sharpen nail clippers and maximize the lifetime of your nail clippers.
3.1 Be careful not to damage the spring or hinge
Handle with Care
- When stropping, exercise caution to avoid putting inordinate pressure on the spring or hinge factors.
- Hold the clippers securely, fastening on the blades during the stropping process.
Maintain Open Position
- Keep the nail clippers in the completely open position to reduce strain on the spring and hinge.
- Avoid manipulating the clippers in a way that could compromise these essential factors.
examination
- Periodically check the spring and depend on any signs of wear and tear or damage.
- If any issues are detected, consider repairing or replacing the damaged factors before further use.
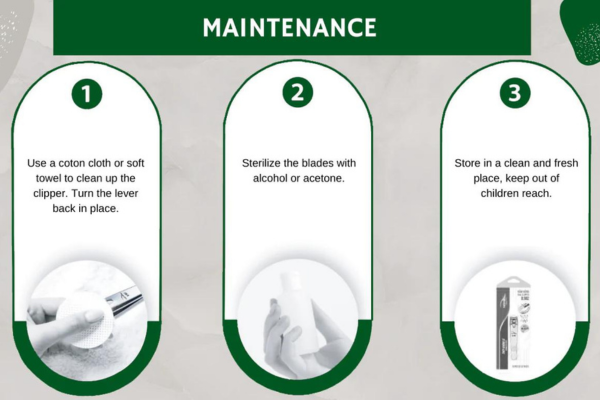
3.2 Store clippers properly
Sot and clean terrain
- Store nail clippers in dry and clean terrain to help erosion.
- Exposure to humidity can lead to rusting, affecting both the sharpness and life of the blades.
Avoid contact with other metal objects
- Store clippers independently from other essence objects to help scrape or damage the cutting edges.
- Consider using a defensive case or poke for a safe storehouse.
Regular conservation
- Perform regular conservation on your nail clippers, including cleaning and slicking the hinge to ensure smooth functionality.
- Check the overall condition of the clippers during routine checks.
3.3 Avoid over-sharpening, which can weaken the blades
Set stropping limits
- Define a clear limit for how much you intend to edge the blades.
- Avoid inordinate stropping, as this can lead to a reduction in blade consistency and compromise their structural integrity.
Test sharpness periodically
- Periodically check the sharpness of the blades by gently closing the clippers.
- Stop the stropping process once the asked position of sharpness is achieved to help overstating it.
Balance sharpness and continuity
- Aim for a balance between sharpness and continuity when stropping.
- Fete that exorbitantly sharp blades may be more prone to damage, and changing the right equilibrium ensures life and effectiveness.
4. Conclusion
In conclusion, the art of nail clipper conservation goes beyond a routine task; it's a mastery of perfection and care. By understanding how to sharpen nail clippers and employing the outlined stropping ways as Nghia Nippers guided above, you can elevate your grooming routine. Embrace the scrupulous styles, cleave to essential considerations, and relish in the satisfaction of constantly achieving a perfect trim. Flash back, the trip to indefectible nails begins with the mastery of the tools that shape them.
>>> See more: Why should you enjoy a large nail clipper?